
In the Modeler View, variety of features are available using Drag and Drop to improve usability.
One or more files can be imported by dragging them from the explorer and dropping them on the Modeler View. The view automatically identifies if the dragged files can be imported or not. If they can be imported, an information is displayed at the top left corner of the view.
CST Projects can be dropped in the modeler view to open them in the existing sheet. If you hold down the Shift key while dropping, a Sub-Project import is performed.


When you use a right mouse button drag, a context menu is offered after dropping the files.

The following files when dropped in the modeler view are imported using the default import options. If you hold down the Ctrl key while dropping, an options dialog is shown before the files are imported.
Additionally, the following EDA import CAD-files are also supported and will launch the EDA Import Dialog on drop:
Cadence Allegro® PCB Editor / Package Designer / Cadence SiP Layout 16.01, 16.2, 16.3, 16.5
CST Layout Database (.ldb-files)
Mentor Graphics® ExpeditionTM PCB ASCII v2004, v2005, v2007.1, v2007.2, for later versions, see this note
Mentor Graphics® PADS® ASCII v2005.0, v2005.2, v2007.0, v9.0, v9.2
ODB++ 6.4, 7.0
Simlab PCBMod all versions
Zuken CR-5000 Board Designer ASCII 12.01 and lower
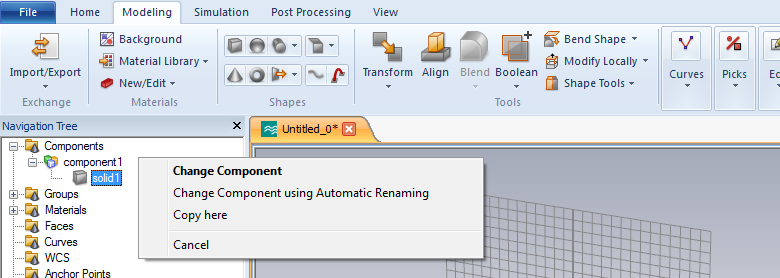
Many operations i.e. Change Component, Change Material, etc can be performed using drag and drop in the navigation tree. Feedback is provided using an appropriate mouse cursor and the status bar text when you look for a target item while dragging.
|
|
|
|
The following items can be dragged in the Navigation Tree:
Components and Solids:
Drop it on a component item to move the dragged items under the target component. Hold down the Ctrl key to move a copy of the dragged items under the target component. Hold down the Shift key to allow automatic renaming of items, if items with the same name already exist under the target component.
Drop it on a material item to assign the target material to the dragged items.
Drop it on a group item to make the dragged items, a part of the target group.
Material:
Drop it on a material folder to move the dragged items under the target folder. Hold down the Shift key to allow automatic renaming of items, if items with the same name already exist under the target folder.
Drop it on a default group item.
'Excluded from Simulation': All solids and wires which have the dragged materials assigned, will be added to the group.
'Excluded from Bounding Box': Only solids which have the dragged materials assigned, will be added to the group.
Drop it on a solid, component, wire folder or a wire item to assign the dragged material to the target items.
Wires:
Drop it on a wire folder to move the dragged items under the target folder. Hold down the Shift key to allow automatic renaming of items, if items with the same name already exist under the target folder.
Drop it on a material item to assign the target material to the dragged items.
Drop it on a group item to make the dragged items, a part of the target group. Wires cannot be dropped on 'Excluded from Bounding Box' default group item.
Lumped Elements:
Drop it on a Lumped folder to move the dragged items under the target folder. Hold down the Shift key to allow automatic renaming of items, if items with the same name already exist under the target folder.
1D Results:
Drop it on a tree folder item to move the dragged items under the target folder. Hold down the Ctrl key to move a copy of the dragged items under the target folder.
When you use a right mouse button drag, a context menu is offered on drop. This context menu offers all possible operations after taking into account the dragged items and the target item.

Please note: The drag and drop operations work within the same model only.
See also
Modeler View, Navigation Tree, Copy and Paste Solids, Importing and Exporting Models