Rotate Face Dialog
 Shapes
 ExtrusionsRotate ExtrusionsRotate
Rotate a picked face around a picked edge. With this function you may
create circles or helixes with the picked face as profile.
After you have created a new shape by rotation, the Shape Intersection Dialog box
will open. There you may add the rotated shape to the original shape from
which you picked the face.
If you have picked a face which can not be rotated, or when you have
not picked any face, you will get to the Rotate Profile Dialog box.
Name
Specify the
of the new shape to be created by the rotate action.
Angle
Specify the angle in degree by which the face
shall be rotated.
Height
To receive a helix you can specify the height
of the helix.
Radius Ratio
This parameter influences the radius of the
helix (height must be greater zero) depending on the height. You can set
the ratio between the radius of the end point and the starting point in
order to design a conical helix. If it is 1.0 the radius is constant over
the height of the helix.
Segments per turn
This parameter influences the number of linear
shape sections which are assumed for one turn. This option is useful if
the analytical description (Segments per turn = 0) of the turn is not
necessary to reach the desired accuracy. In this case a segmented approximation
is the faster way (you can get sufficient results for most cases with
10 Segments per turn).
Examples
The three pictures below illustrate the results
for different construction parameters.
|
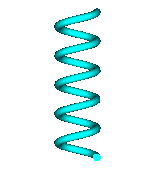
Segments per Turn : 0
Radius Ratio : 1.0 |

Segments per Turn : 10
Radius Ratio : 1.0 |
|
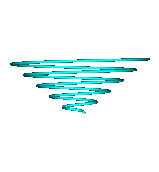
Segments per Turn : 0
Radius Ratio : 10 |
|
Component
Choose a new
from the select list. You can also create a new component by typing the
name of the new component.
Material
Select the material
to which this shape will be assigned from the list of previously defined
materials or create a new material by selecting [New
Material...]. You can also load a material from the material library
by selecting [Load from Material Library...].
OK
Press this button to finally create the shape.
Preview
Press this button to create a preview image
of the new shape. This option is very useful to check the settings before
you actually create the shape.
Cancel
Closes this dialog box without performing any
further action.
Help
Shows this help text.
See also
Brick,
Sphere, Cylinder,
Elliptical cylinder, Cone,
Torus, Extrude
Profile, Extrude Face,
Rotate Profile, Loft,
Shell, Coordinate
systems, Transform.


HFSS视频教程
ADS视频教程
CST视频教程
Ansoft Designer 中文教程
|
