|
微波射频仿真设计 |
|
|
微波射频仿真设计 |
|
| 首页 >> Ansoft Designer >> Ansoft Designer在线帮助文档 |
|
Layout Editor User Guide > Drawing an ArcDraw an arc by selecting a center point, start point, and endpoint. Arcs are drawn counter-clockwise and as true surfaces. 1. On the Draw menu, point to Primitive, and then click Arc. 2. Select the center point of the arc in one of the following ways: • Click the mouse on the point. • Type the point’s coordinates in the X and Y text boxes. 3. Select the arc’s start point using the mouse or the keyboard. 4. Select the arc’s endpoint using the mouse or the keyboard. The arc is added to the active layer.
Additional Notes for Drawing an Arc1. After clicking the arc toolbar icon or the arc menu item, the cursor changes to indicate arc creation. The first mouse-click location in the editor specifies the center point for the arc. Alternatively, rather than clicking in the editor, you can always enter an equivalent value in the coordinate bar to indicate a location. 2. Cursor movements draw an arc showing the radius and starting angle based on cursor position. Both the radius and starting angle may change as the cursor is moved. 3. The next mouse-click in the editor specifies both the radius and the starting angle for the arc. In the following figure, point A is the location of the first click. Point B is the location of the second click. 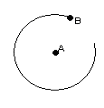 4. Cursor movements change the ending angle only; the radius is fixed. During a mouse hover, the cursor is moved to the radius. The end angle indicated by the cursor position remains unchanged. Grid snapping is relative to the moved position and the snap is constrained to remain at the defined radius. Only end angles at 0, 90, 180, and 270 degrees from the start angle will grid snap; other end angles do not intersect a grid intersection. In the following figure, the cursor hovers at C. The line from A to C indicates the end angle position. D is the location to which the cursor is moved. 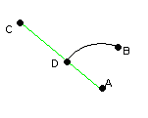 5. The next click specifies the end angle for the arc. Note that this location may NOT be the end point of the arc. The end point of the arc is the position along the ending angle at the defined radius. If the cursor is clicked at C, the arc will be created with D as the end point. If the cursor is clicked at D, the arc is created with D as the end point. Related Topics
HFSS视频教程 ADS视频教程 CST视频教程 Ansoft Designer 中文教程 |
|
Copyright © 2006 - 2013 微波EDA网, All Rights Reserved 业务联系:mweda@163.com |
|


