Auto save
The software offers the possibility of periodically creating a backup of the project files that have been modified after they were saved or opened. This frame allows you to switch this functionality on or off and to specify the time interval.
Backup project automatically: Choose this option to activate the automatic backup.
Time interval: Specify the backup time interval in minutes.
Application start
When you open a project that is older than the current version, then it has to be converted first. Before the conversion you are asked to set the backup options.
Ask for backup options: Choose this option to be asked for the backup options before the conversion.
Always backup project: Choose this option when you always want to make a backup of the project which was created from an older version.
Always include results in backup folder: Choose with this option whether you always want to include the results of the old project in the backup folder or not.
If you always work within the same module, you may configure the software to automatically start that module after the software is launched.
General settings
Storage mode for 1D results: Select SQL Format or ASCII and SQL.
Parametric: Choose this option to enable global parametric storage mode for 1D results.
Priority of solver processes: Here you can select the priority for solver processes on your operating system. You can choose between "Low" (default value) and "Normal."
Temporary directory: Change the temporary directory of all CST modules here. You can use this directory to store all your projects to. Also in this directory all unsaved files will be stored, so make sure that enough disk space is available.
Confirm before opening workspace files: Choose this option to ask for confirmation before closing all opened project to load a new workspace.
User Interface settings
Reset window layout: Use this command to reset the position, size, and visibility of the windows for all project modules. Available windows can be accessed in the Home or View ribbon with the Windows drop down command.
Color scheme: You may change the color scheme of the program here.
Automatic software updates
This setting allows you to configure the automatic software update system.
No Automatic Updates: Do not automatically search for software updates.
Update from Internet: Automatically search for software updates in the internet. The web server will be automatically chosen. If you connect to the internet via a proxy server which requires authentication, you need to specify the corresponding user name and password in the Proxy server user name and Proxy server password fields, respectively.
Update from Local Directory: Automatically search for software updates in a local directory. The path to the directory can be specified in the Update source directory field if this option is selected.
Library paths
Displays the list of directories selected as library paths. They are ordered according to their priority: directories given at the top of the list are always considered first. To modify an entry, perform a double-click there.
New: Creates a new entry at the bottom of the list. You may instead perform a double-click directly under the last entry.
Delete: Removes the selected entry from the list.
Move Up: Moves the selected entry to the precedent position.
Move Down: Moves the selected entry to the subsequent position.
Main controller settings
This dialog will cover the setup of the main
controller, used for distributed computing and for MPI.
Note: The settings for the CST Main Controller are stored on a per user
basis. It is possible to define additional main controller per project.
Server Name or IP address: Enter the address of a running CST Main Controller. IP address is also accepted. Please note, that in case of a node-locked license, the CST Main Controller must run on the same computer as the front-end.
Port: Enter the TCP port of the CST Main Controller.
Local host information: This list is for information purposes only. It displays your local host name and your local IP addresses. Sometimes the computer has more than one network card connected to different sub networks so that more than one IP address is available.
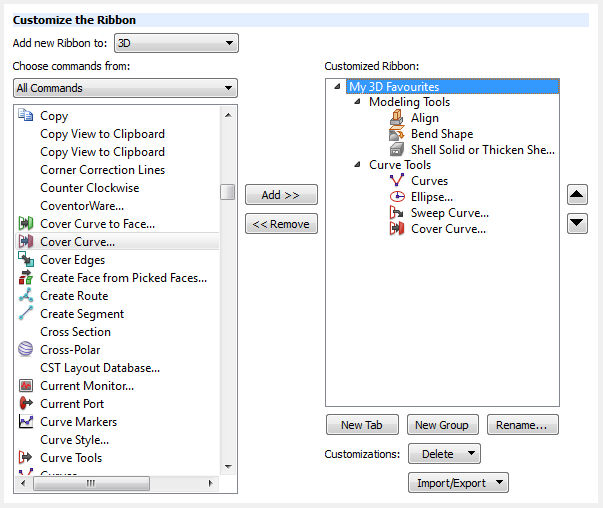
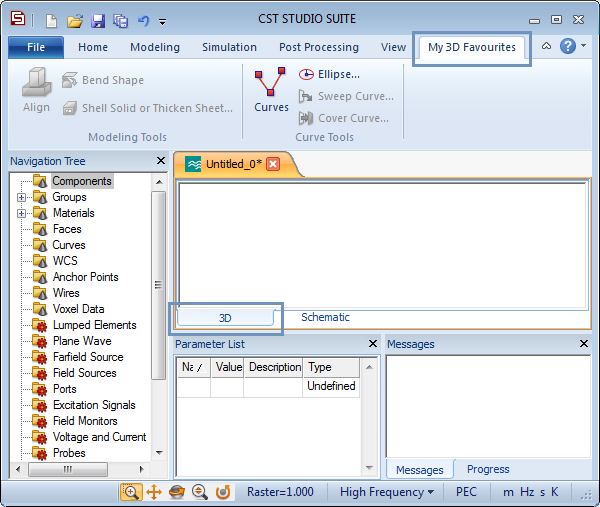
Customize the Ribbon
This dialog page allows you to add a ribbon that you want to the default ribbons. For example, you can create custom tabs and custom groups containing the commands you are frequently using.
Please note that the default tabs and groups that are built-into the CST program cannot be changed.
You can personalize the ribbon for different project modules: 3D, Schematic, or PCB. For example, when you select 3D in the drop-down list on the top of the dialog page then the custom tabs are only displayed when the 3D window is active.
The list on the left side of the dialog page contains all commands relative to the selected project module. The drop-down list above this list can be used to filter the commands. For example, you may filter the list such that only the commands which are available in the modeling ribbon are shown.
The list on
the right side displays the custom tabs, groups and commands also
relative to the selected project module.
|
|
|
|
New Tab: When you click this button, a custom tab and custom group is added. Note that commands can only be added to custom groups.
New Group: First select the tab you want to add a group to. Then click New Group.
Add commands to a custom group: First select the group you want to add a command to. Then select the command in the list on the left side and click on the Add button. Doubly-clicking on the command also adds the command to the selected custom group.
Remove a custom tab, group or command: Select the item that you want to remove and click the Remove button.
Rename: Click this button to rename a custom tab or group. You can also double-click on the tab or group which you want to rename.
Change the order of custom tabs, groups or commands: Select the item in the list on the right side you want to move, and then click on the Move Up or Move Down arrow until you have the order you want.
Delete ribbons from all views: When you click this button then you delete all user-defined ribbons from all views (3D, Schematic and PCB).
Delete ribbons only from the selected view: When you click this button then you delete all user-defined ribbons only from the selected view. The currently selected view is shown in the drop-down list below the ”r;r;Add new Ribbon to:”r; text.
Import/Export: You have the possibility to export the custom defined ribbons of all views (3D, Schematic and PCB) to a customization file. You can import these customization files to replace the custom defined ribbons and to add them to the current ribbon layout. Please note, if you import a ribbon customization file, you lose all prior custom defined ribbons of all views.
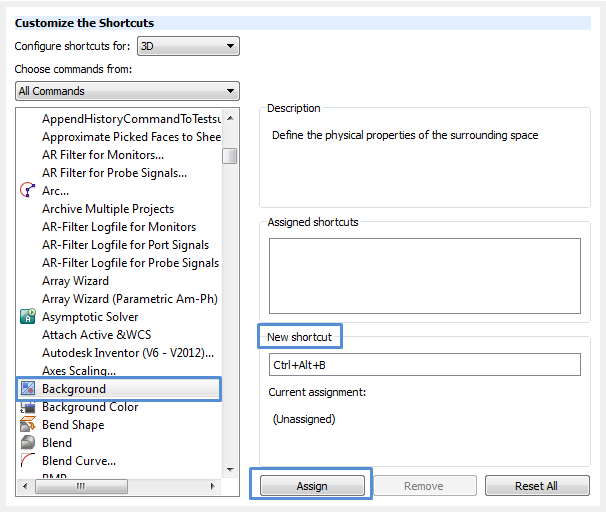
Customize the Shortcuts
This dialog page allows you to configure the shortcut keys.
You can personalize the shortcut keys for different views: 3D, Schematic, PCB, 1D Plot, Macros, or Parameter View. For example, when you select 3D in the drop-down list on the top of the dialog page then the commands available in this view are shown in the list below. Any shortcut key customization will be applied to this view. Note that the same shortcut key could be applied on a different command of another view as well.
The list on the left side of the dialog page contains all commands relative to the selected view. The drop-down list above this list can be used to filter the commands. For example, you may filter the list such that only the commands which are available in the modeling ribbon are shown.
|
|
|
Description: After you select a command in the list on the left side, the description of the command will be shown in the Description field.
Assigned shortcuts: After you select a command in the list on the left side, the potentially assigned shortcuts will be shown in the Assigned shortcuts field.
New shortcut: You may enter a new sequence of keys in this field. The current assignment will be shown in the field below.
Assign: Click this button to assign a new sequence of keys entered in the New shortcut field to the currently selected command in the list on the left . Any current assignment of the new sequence of keys will be removed.
Remove: Click this button to remove the currently selected shortcut in the Assigned shortcuts field from the selected command.
Reset All: Click this button to reset all commands to their default shortcut keys.
Customize the Quick Access Toolbar
This dialog page allows you to customize the Quick Access Toolbar which is located on the upper-left corner next to the CST icon. The toolbar contains a set of commands that are independent of the ribbon tab which is currently displayed.
The list on the left side of the dialog page contains all commands. The drop-down list above this list can be used to filter the commands. For example, you may filter the list such that only the commands which are available in the modeling ribbon are shown.
The list on the right side displays the commands of the Quick Access Toolbar.

Add a command: Select the command in the list on the left side you want to add and then click on the Add button. Doubly-clicking on the command also adds the command to the Quick Access Toolbar.
Remove a command: Select the command in the list on the right side you want to remove and then click on the Remove button. Doubly-clicking on the command also removes the command from the Quick Access Toolbar.
Change the order of the commands: Select the command in the list on the right side you want to move, and then click on the Move Up or Move Down arrow.
Restore Defaults: Click this button to reset the Quick Access Toolbar to the default settings.
OK
Confirms your settings and leaves the dialog box.
Cancel
Closes this dialog box without performing any further action.
Help
Shows this help text.