
教你在CST如何获取驻波VSWR的方法
05-08
单端口激励情况下,可以直接通过CST 自带宏命令获取VSWR;多端口同时激励情况下,需要通过在后处理模板进行设置得到VSWR。下面对这两种情况分别举例说明。
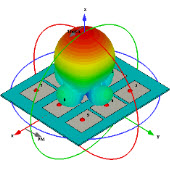
1) 如图所示为魔 T 结构,设置为端口1 激励。求解后得到S 参量结果。

2) 在主菜单中,打开 Results → S-Parameter Calculations → Calculate VSWR

3) 在导航树中,按照 1D Results →VSWR → VSWR1 路径即可查看VSWR。

多端口同时激励情况下,不可以直接使用 Results → S-Parameter Calculations → Calculate VSWR,需要在后处理模板进行操作以获得VSWR。下面举例说明:
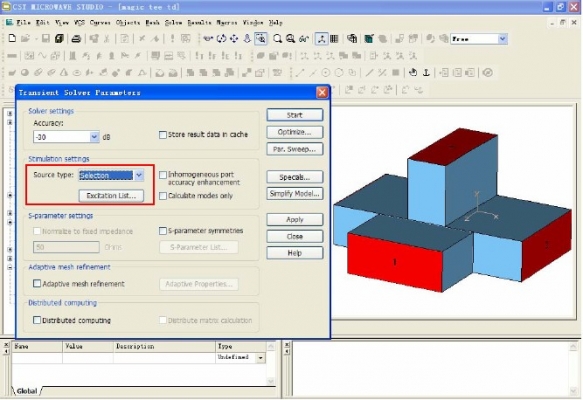
1) 仍然是该魔 T 结构,选择Source type 为Selection,并点击Excitation List…。
2) 在弹出的 Excitation Selection 窗口中,设置为Port 1 和Port 2 同时激励,并点击activate。

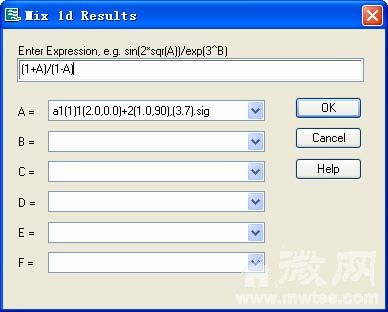
3) 您可以点击 Phase shift,设置一定的相移。如图所示,激活Phase shift 后,我们在Port 2 处设置了90 度的相移,并设置Port 1 的幅度为2 倍。图示Label 框中1[2.0,0.0]+2[1.0,90],[3.7]指代意义为:在Port 1 处以2 倍幅度,0 度相移(3.7GHz)的激励信号;在Port 2 处以1 倍幅度,90 度相移(3.7GHz)的激励信号同时激励。其中1[2.0,0.0]意义为端口编号[幅度倍数,相移]。

4) 设置完成后,点击 OK,然后运行时域求解器进行仿真求解。
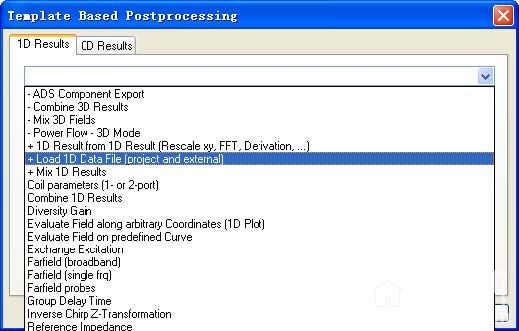
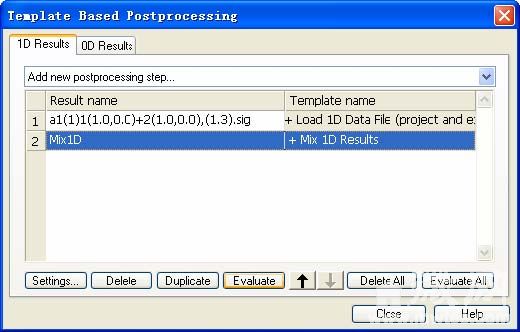
5) 求解完成后,打开后处理模板,选择 1D Results,在下拉菜单中选择+Load 1D Data File (project and external)
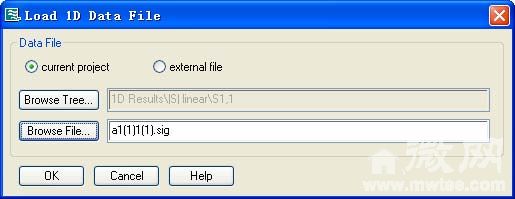
6) 在打开的 Load 1D Data File 中选择Browse Tree 打开浏览器。
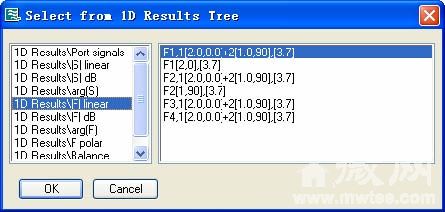
7) 在打开的浏览器中选择 1D Results → |F| linear → F1,1[2.0,0.0]+2[1.0,90],[3.7] ,点击 OK。
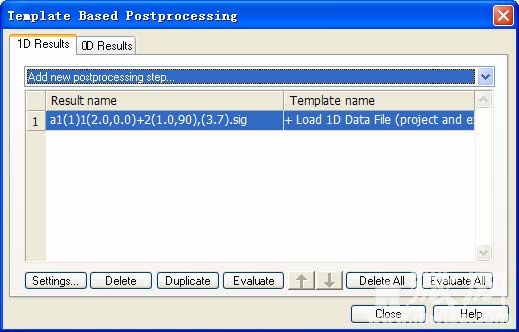
8) 点击 Evaluate 将数据加载到后处理模板中
9) 在后处理模板中选择+Mix 1D Results。
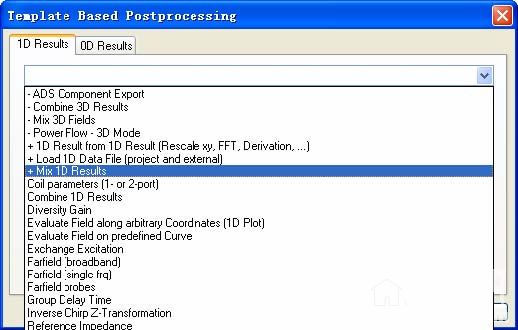
10) 在打开的 Mix 1d Results 对话框中计算VSWR=(1+A)/(1-A)。
11) 回到后处理模板中点击 Evaluate 即可获得需要的VSWR结果。
1) 如图所示为魔 T 结构,设置为端口1 激励。求解后得到S 参量结果。
2) 在主菜单中,打开 Results → S-Parameter Calculations → Calculate VSWR
3) 在导航树中,按照 1D Results →VSWR → VSWR1 路径即可查看VSWR。
多端口同时激励情况下,不可以直接使用 Results → S-Parameter Calculations → Calculate VSWR,需要在后处理模板进行操作以获得VSWR。下面举例说明:
1) 仍然是该魔 T 结构,选择Source type 为Selection,并点击Excitation List…。
2) 在弹出的 Excitation Selection 窗口中,设置为Port 1 和Port 2 同时激励,并点击activate。
3) 您可以点击 Phase shift,设置一定的相移。如图所示,激活Phase shift 后,我们在Port 2 处设置了90 度的相移,并设置Port 1 的幅度为2 倍。图示Label 框中1[2.0,0.0]+2[1.0,90],[3.7]指代意义为:在Port 1 处以2 倍幅度,0 度相移(3.7GHz)的激励信号;在Port 2 处以1 倍幅度,90 度相移(3.7GHz)的激励信号同时激励。其中1[2.0,0.0]意义为端口编号[幅度倍数,相移]。
4) 设置完成后,点击 OK,然后运行时域求解器进行仿真求解。
5) 求解完成后,打开后处理模板,选择 1D Results,在下拉菜单中选择+Load 1D Data File (project and external)
6) 在打开的 Load 1D Data File 中选择Browse Tree 打开浏览器。
7) 在打开的浏览器中选择 1D Results → |F| linear → F1,1[2.0,0.0]+2[1.0,90],[3.7] ,点击 OK。
8) 点击 Evaluate 将数据加载到后处理模板中
9) 在后处理模板中选择+Mix 1D Results。
10) 在打开的 Mix 1d Results 对话框中计算VSWR=(1+A)/(1-A)。
11) 回到后处理模板中点击 Evaluate 即可获得需要的VSWR结果。
我看看哦
自己顶一贴
相关文章:
- 四臂螺旋天线驻波比(05-08)
- 请问HFSS 10里怎么看天线的驻波比?(05-08)
- 器件的驻波和谐振(05-08)
- CST2008里如何看驻波比?(05-08)
- SMA驻波大什么原因?(05-08)
- 请教cst 计算驻波比(05-08)
射频专业培训教程推荐