
This document describes the installation and usage of CST STUDIO SUITE on your cluster.
Supported Solvers and Features
Installation of CST_STUDIO_SUITE on a Cluster System
Installation of MPI Frontend Node
Installation of MPI Client Node
Starting MPI Simulations in Interactive Mode
Starting MPI Simulations from Command Line
Select Interconnect Used for MPI Communication
Unattended Installation of MPI Service on Windows
High Speed Interconnect Configuration
Configuration of Linux Remote Login without Shared Homes
The following section explains the nomenclature used in this document.
|
command |
Commands you have to enter on a command prompt (either cmd on Microsoft Windows or your favorite shell on Linux) are typeset using typewriter fonts. |
|
<...> |
Within commands, the sections you should replace according to your environment are enclosed in "<...>". For example "<CST_DIR>" should be replaced by the directory where you have installed CST STUDIO SUITE (e.g. "c:\Program Files\CST STUDIO SUITE 2013"). |
The following section contains the definition of some important terms needed to understand the rest of the manual.
|
Cluster |
Computers connected via a fast interconnection network and used as a single "supercomputer". |
|
Node |
An arbitrary computer in your cluster system. |
|
MPI Frontend Node |
The cluster node on which the simulation is started using the CST front end (CST DESIGN ENVIRONMENT). |
|
MPI Client Node |
A cluster node which takes part in a CST MPI simulation. An MPI Frontend Node can be an MPI Client Node at the same time. |
This section provides you with information about the hardware as well as the software requirements necessary to successfully perform CST simulations on your cluster system. Please ensure that your system is configured according to the following points to avoid problems during the setup or operation of CST STUDIO SUITE.
The nodes in your cluster must be connected via a TCP/IP network (Ethernet).
CST STUDIO SUITE 2013 supports high speed interconnection networks for MPI Computing such as InfiniBand and Myrinet, i.e. the data exchange mechanism can circumvent the network stack of the operating system and work directly on the network adapters of the high speed interconnect taking advantage of the low latency and high bandwidth of the network.
However, if your cluster is equipped with such a high speed interconnect make sure that the nodes can also communicate via a TCP/IP link (e.g. Ethernet interconnect) as this is needed by the mechanism which starts simulations using MPI Computing on the cluster.
Windows
Under the Windows operating system, high speed interconnects are supported
through the DAPL (Direct Access Provider Library) interface. A DAPL interface
is provided for example by the OpenFabrics Windows drivers. Note that
most drivers provided by Mellanox do not provide a DAPL interface on Windows.
Linux
Under the Linux operating system, InfiniBand is supported through the
OFED (OpenFabrics Enterprise Distribution) verbs interface. QLogic PSM
and Myricom MX interconnects are supported through the TMI (Tag Matching
Interface). Other interconnects are supported through DAPL.
The names of the cluster nodes must be correctly resolved to IPv4 addresses (not IPv6 addresses) either using a DNS or appropriate entries in the "hosts" file of your nodes if you use static IP addresses.
All nodes participating in an MPI simulation must be part of the same network, i.e. the MPI Frontend Node must not be a machine outside the cluster which cannot directly access the MPI Client Nodes. A simple check if all the cluster nodes are in the same network can be performed using the ping command. To check if <nodeA> can "see" <nodeB> just enter the following command on a terminal on <nodeA>:
ping <nodeB>
If <nodeB> answers correctly the two nodes are in the same network and can communicate during an MPI simulation.
There are no special hardware requirements for the cluster nodes. However, if you intend to use GPU Computing together with MPI please refer to the "GPU Computing Guide" to learn more about the special requirements for the GPU hardware.
The following operating systems are supported (32 bit and 64 bit versions).
Windows XP, Windows Vista, Windows 7
Windows Server 2003 R2
Windows Server 2008 R2
Red Hat Enterprise Linux 5
Additionally, MPI Client Nodes must be homogeneous in terms of the operating system (either MS Windows (32/64 bit) or Linux (32/64 bit)). The following configurations are currently supported:
|
MPI Frontend Node |
MPI Client Nodes |
|
Windows |
Windows |
|
Windows |
Linux |
|
Linux |
Linux |
The following table gives you an overview of the solvers which currently support MPI Computing and of the features which are supported with MPI for these solvers.
|
CST Product |
Solver |
Notes |
|
CST MICROWAVE STUDIO |
T-Solver |
Unsupported features:
|
|
CST MICROWAVE STUDIO |
I-Solver |
Direct (MoM) and iterative (MLFMM) solvers are supported. |
|
CST MICROWAVE STUDIO |
F-Solver |
The direct solver is supported. |
|
CST PARTICLE STUDIO |
WAK-Solver |
Unsupported features:
|
The following section provides you with step-by-step installation instructions for several typical cluster setups. There are different install sets needed to install an MPI Frontend Node and an MPI Client Node.
A typical installation is a three step procedure:
Installation and configuration of a frontend node.
Installation and configuration of all the compute nodes.
Configuration of the remote login.
Please note that an MPI Frontend Node is a machine in your cluster which you want to be able to start CST MPI simulations from. Thus, if you want to be able to start CST MPI simulations from an arbitrary node in your cluster (e.g., because this is the requirement of a queuing system you are using), then each of your cluster nodes is an MPI Frontend Node and you need to perform the following steps on each of your nodes.
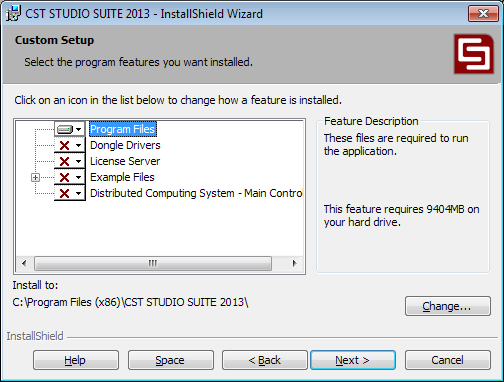
An MPI Frontend Node needs a full installation of the CST STUDIO SUITE program files. Thus, install at least the feature set shown below on each Windows node of your cluster. These nodes should then be able to start a CST MPI simulation. Note that the "License Server" as well as the "Dongle Driver" option must only be selected if the node should act as license server for your installation. It will not harm the setup if you select the other features as well.
Features for an Windows MPI Frontend Node:
An MPI Frontend Node needs a full installation of the CST STUDIO SUITE command line interface. Thus, install at least the feature set shown below on each Linux node of your cluster. These nodes should then be able to start a CST MPI simulation. Note that the "License Server" as well as the "Dongle Driver" option must only be selected if the node should act as license server for your installation. It will not harm the setup if you select the other features as well. If your MPI Frontend Node should also act as an MPI Client Node please also select the "MPI Client Node" option.
Features for a Linux MPI Frontend Node:

To install a machine as MPI Client Node three steps are necessary.
The first step is to install the CST MPI service which allows the MPI Frontend Node to connect to the client nodes. For this purpose a special installer executable is provided within the CST installation directory on your MPI Frontend Node. This executable is called "mpi_install.exe". Please copy this installer from the MPI Frontend Node to the MPI Client Node and execute it there. Double clicking on the executable will start the installation process. Please follow the instructions of the installer. If you need to install it automatically on a lot of nodes, please see the section on unattended installation. Please note that you need administrative privileges to run the installer.
The second step in the installation process is to make the solver executables accessible. This can be performed in two different ways:
The first possible way is to share the CST installation folder on your MPI Frontend Node such that this folder may be accessed from the MPI Client Nodes. This does only work if you have a server operating system on your MPI Frontend Node. Desktop operating systems such as Windows 7, Windows Vista or Windows XP will produce errors with too many connections to a shared folder.
The second possible way is to perform an installation of the CST STUDIO SUITE executables on the MPI Client Node as well (the same install set as for the MPI Frontend Node in the previous section).
The third step is to create a temporary folder, which will be used by the solvers during simulation and which will be specified in the GUI or a configuration file when starting the simulation. As this folder will be used to save temporary data during the simulation run please make sure that you have enough free space on the disk partition on which the folder is created.
To install a machine as MPI Client Node two steps are necessary:
The first step in the installation
process is to make the solver executables accessible. This can be performed
in two different ways. Whichever way you choose, please make sure that
the installation is visible on all nodes at the same path. The two possible
ways are:
Execute the Linux installer. Select the install option "MPI Client Node" (If your MPI Frontend Node is also running on Linux please select the "Command line interface" option as well, as this is necessary to be able to update your installation later on with the service packs provided by CST). This will install all Linux solver executables. If the MPI Client Node should also act as MPI Frontend Node please refer to section "Installation of MPI Frontend Node".
Mount an existing CST
Linux installation using a remote file system, for example nfs. Please
note that the central CST installation needs to reside on a Linux machine.
A Windows installation of CST STUDIO SUITE mounted
via e.g. Samba to a Linux MPI Client Node is not a valid configuration.
You can also mix these two ways of making the solver executables
accessible within one cluster, as long as the installation is available
on all nodes with the same path. So for example you can perform an installation
on one node to /opt/cst
and mount that to /opt/cst
using nfs on all other nodes.
The second step is to create a temporary folder, which will be used by the solvers during simulation and which will be specified in the GUI or a configuration file when starting the simulation./tmp will work fine. As this folder will be used to save temporary data during the simulation run please make sure that you have enough free space on the disk partition on which the folder is created.
So, if CST STUDIO SUITE is installed in a shared filesystem which is visible on all nodes /tmp is used as a temporary folder, nothing has to be installed on MPI Client Nodes.
To start MPI simulations on other Windows
machines you have to provide the credentials of an user account which
will be used by CST STUDIO SUITE to log in to the MPI Client Nodes and
start the simulation processes. Make sure that the user account you provide
is known by MPI Client Node machines. This is typically ensured if the
user account is a domain account. However, if you are providing a local
user account for this purpose please make sure that this account is defined
on all MPI Client Nodes identically and the password for the account is
also the same on all nodes. To register the user account please open a
terminal (Start ![]() Run
Run ![]() cmd) on the MPI Frontend Node
and go to the installation directory of CST STUDIO SUITE then enter the
command:
cmd) on the MPI Frontend Node
and go to the installation directory of CST STUDIO SUITE then enter the
command:
mpiexec -register
You will then be asked for the user credentials and the information you provide will be written to the registry:
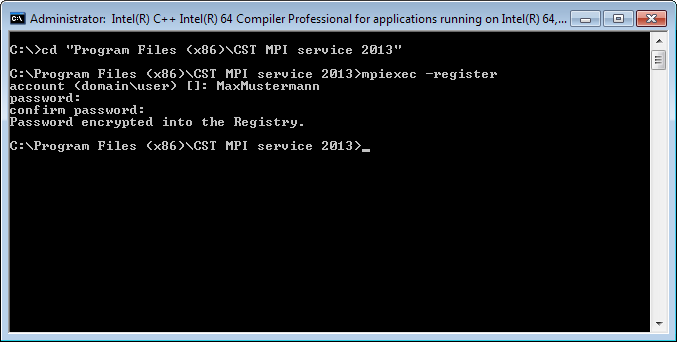
Make sure that the user account you register has at least read and execute access to the installation folder.
For remote login on a Linux cluster, ssh is used. You need to configure your cluster to allow password-less ssh access to all MPI Client Node machines. The typical procedure to configure password-less ssh remote login is:
Create
a pair of a private and a public key for ssh.
Do not use a passphrase:
ssh-keygen -t rsa
This should have created the two files id_rsa
and id_rsa.pub
in a directory named .ssh
in your home directory.
Append the content of id_rsa.pub
to the file ~/.ssh/authorized_keys,
e.g. by using the command
cat ~/.ssh/id_rsa.pub >> ~/.ssh/authorized_keys
If your cluster has a shared home directory on all nodes, you are now
able to log in to all MPI Client Nodes without being asked for a password.
In case you have no shared home directory, please see section "Configuration of Linux Remote Login without Shared
Homes". If you log into your MPI
Client Nodes for the first time, it will complain that the authenticity
of the host can't be established and it will ask you if you want to continue.
Answer this question with yes.
Now you should be able to
login to each of your nodes without a password. To test that, query the
hostname of each node using ssh:
ssh <nodename> hostname
This should give you the hostname without prompting for a password.
Note: Some versions of ssh require that the permission flags of the
authorized_keys
are such that it cannot be accessed by anyone else than the owner. If
you are still asked for a password after you appended the public key to
the authorized_keys
file try to change the permissions of this file like this:
chmod 600 ~/.ssh/authorized_keys
If you use a Windows MPI Frontend Node and Linux MPI Client Nodes, more configuration work is necessary.
First you need to configure your Windows MPI Frontend Node as described in section "Installation of MPI Frontend Node".
Second configure your Linux MPI Client Nodes as described in section "Configuration of Remote Login Linux Cluster". Check that you can login from each MPI Client Node to each other MPI Client Node without being asked for a password.
You need to allow your Windows MPI Frontend Node remote access to all of the Linux MPI Client Nodes through the software package 'putty', which is partly included in the installation of CST STUDIO SUITE.
Create a second pair
of a public and a private key for the Windows MPI Frontend Node to login
to the Linux MPI Client Nodes. To do that, execute puttygen.exe
from the installation folder of CST STUDIO SUITE. Click on "Generate",
then move the mouse over the blank area to create some randomness. Then
save both the generated public and private key to your hard disk. You
will be asked for your private key when starting a simulation. Also copy
the public key from the text field named "Public key for pasting
into OpenSSH authorized_keys file" into a text file to store it.
You will need it to configure the nodes.

Append the public key
from the field named "Public key for pasting into OpenSSH authorized_keys
file" to the ~/.ssh/authorized_keys
file on every Linux MPI Client Node. The ~
refers to the home directory of the user account on the Linux machine
which you want to use to run your MPI jobs.
Note: You may use the tool pscp.exe
which can be found in the CST installation folder to copy the file to
your Linux machines.
To make the host keys of all Linux MPI Client Nodes known to the Windows MPI Frontend Node, login to each of the MPI Client Nodes once from the Windows MPI Frontend Node. To do that, start putty.exe from the installation folder of CST STUDIO SUITE and specify the hostname of the MPI Client Node. Click on "Open". The first time you do that, a window will pop up asking whether or not to accept the host key of the host. Accept the key by clicking on "Yes". Then you can close the terminal that opens up. Repeat this for every MPI Client Node. Note that you need to specify the hostname here as you will later specify it in the CST STUDIO SUITE GUI. So if you use <hostname.domainname> here, you cannot use just <hostname> in the GUI and vice versa.
As soon as you have finished the installation,
it is a good idea to test whether all your nodes are correctly configured.
Please open the CST STUDIO SUITE frontend on your MPI Frontend Node. Either
create a small test model, e.g., using Home:
Macros![]() Macros
Macros![]() Construct
Construct![]() Online or load a
model you would like to test. Open the MPI
Cluster dialog of your solver (i.e. Simulation:
Solver
Online or load a
model you would like to test. Open the MPI
Cluster dialog of your solver (i.e. Simulation:
Solver![]() Start
Simulation
Start
Simulation![]() Acceleration
Acceleration![]() MPI Properties:
MPI Properties:
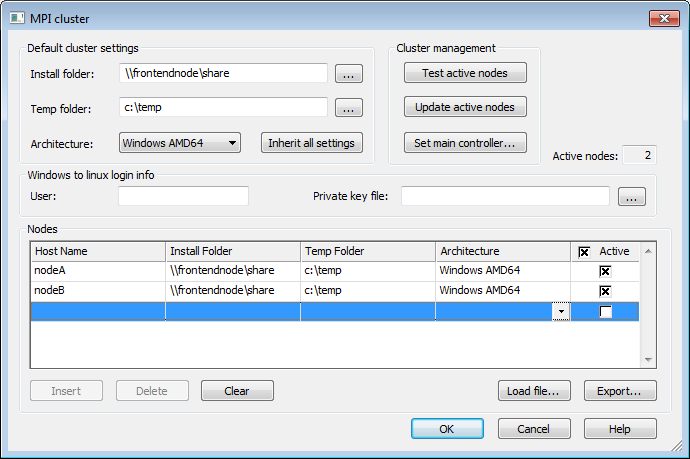
Enter the names of your MPI Client Nodes as well as the CST installation directory on each node, and a temporary directory which will be used to store files on the MPI Client Nodes during the simulation (Please note that this directory must already exist on the nodes as it will not be created automatically!). You can either enter this information for each node manually or just enter global settings and apply them to all nodes stored in the list by right-clicking on the head of each column and selecting "Inherit Default". Then click on "Test active nodes" to test all nodes in your list or right-click on the name of a certain node and select "Test Node" in the context menu to test a special node, respectively. This test checks the configuration of each active node in terms of the MPI simulation requirements, i.e. the given hostname, installation folder, and temporary folder. Depending on the number of nodes the test may last for some seconds. If the test was successful you can start your first MPI simulation.
To activate MPI Computing the MPI option has to be checked in the "Acceleration" settings of the solver. In addition to this the MPI Client Nodes have to be specified in the "MPI Properties". For each node, the CST installation folder and an architecture has to be specified. In addition a temporary folder can be specified. If temporary folder is not defined, cluster nodes use their local sytem temporary directory. On Windows OS system function GetTempPath() from winbase.h is called, on Linux OS environment variable TMPDIR is used. The cluster settings can be saved to a file with the "Export" button. The settings can then be restored using the "Load File..." button. This exported file corresponds to the CST machine file format that will be described in the following section.
If you start your simulation from the command line you can either use the MPI settings previously made in the MPI Properties dialog of your model as described in the last section or provide the MPI settings using a machinefile. A machinefile is in the simpliest case a list of client nodes (MPI format) or it can be created by the "Export" function in the MPI dialog (CST format). Machinefiles created by job queuing system can be used as well they are typically in MPI format. Please refer to the Application Note "Interaction of CST STUDIO SUITE with External Job Queuing Systems" on the CST support website to learn more about the correct configuration of your queuing system for CST simulations. To start your simulation from the command line using a machinefile you can specify the option
-withmpi -machinefile "<FULL_PATH_TO_MACHINEFILE>" -queuesys "CST"
which will load the MPI settings from the specified machinefile (CST format). Please note that the settings in the machinefile have precedence over the settings made in the "MPI Computing" dialog. The quotes are mandatory. The format of the CST machinefile is as follows:
# CSTMachineFile 20080509
# Template for machine configuration in internal CST format.
# The very first line should be as shown, with version numbering.
# It is possible to set common default settings, to be applied to
# all nodes in the cluster, unless differently specified.
# All lines beginning with "#" are comments
#
# The default settings are specified here:
#
# DefaultInstallationFolder <PATH_TO_INSTALLATION_FOLDER>
# DefaultTempFolder <PATH_TO_TEMP_FOLDER>
# DefaultMachineArchitecture <ARCHITECTURE>
#
# Then each machine node is specified as follows:
# HostName # <PATH_TO_INSTALLATION_FOLDER> ; <PATH_TO_TEMP_FOLDER> ; <ARCHITECTURE> ; <ActiveFlag>
#
# Architecture can have following values:
# Windows IA32, Windows AMD64, Linux IA32, Linux AMD64
#
# The <ActiveFlag> can have the following values: Active, Inactive
#
# The following list provides an example for a valid list of machines
# machine1 uses its own settings
machine1 # "C:\Program Files (x86)\CST STUDIO SUITE 2011" ; "C:\temp" ; Windows AMD64 ; Active
# machine2 uses the default settings
machine2 # ; ; ; Active
If you are using a simple list of machine names as machine file (MPI format)
machine1
machine2
the simulation needs to be started with the following command line options:
-withmpi -machinefile "<FULL_PATH_TO_MACHINEFILE>" -queuesys "MPI"
In this case information on CST installation folder and architecture is missing in the machinefile. Thus installation folder of launched CST STUDIO SUITE version and architecture of front end machine will be assumed for the client nodes as well. As mentioned above, as temporary folder the cluster nodes automatically use their local sytem temporary directory creating a unique working folder. According information will be written to the message window.
The interconnect used for MPI communication can be chosen using the environment variable I_MPI_FABRICS.
To select TCP/IP (Ethernet) as interconnect, set I_MPI_FABRICS to "tcp":
MS Windows (64 Bit):
set I_MPI_FABRICS=tcp
<CST_DIR>\CST DESIGN ENVIRONMENT.exe <options>
Linux (64 Bit):
export I_MPI_FABRICS=tcp
<CST_DIR>/cst_design_environment <options>
If your MPI Frontend Node is connected to more than one TCP/IP networks, select the network to be used by setting the registry key
HKLM/Software/Wow6432Node/CST AG/CST DESIGN ENVIRONMENT/2013/PreferredMPIIP
to a string value of the IP of the network adapter to be used. If necessary, e.g. because the IP is set via DHCP and changes from time to time, it is possible to specify an IP with a netmask using the syntax IP/mask. In the mask, the number of relevant bits is specified. For example, setting this value to 192.168.0.0/24 selects the TCP/IP adapter with an IP of the form 192.168.0.XX.
On Linux, the corresponding entry is already preconfigured in <CST_DIR>/Linux32/cst_registry.reg and just needs to be uncommented.
To select InfiniBand as interconnect, set I_MPI_FABRICS to "dapl" (Windows) or "ofa" (Linux):
MS Windows (64 Bit):
set I_MPI_FABRICS=dapl
<CST_DIR>\CST DESIGN ENVIRONMENT.exe <options>
Linux (64 Bit):
export I_MPI_FABRICS=ofa
<CST_DIR>/cst_design_environment <options>
The software version of your CST installation must be identical on all nodes of the cluster. The way how you install the service packs you get from CST depends on the configuration of your cluster system, i.e. the operating system installed on the nodes.
In case you have set up your cluster such that the CST STUDIO SUITE files are accessed by the MPI Client Nodes using a shared folder you only need to update this single shared installation. This may be performed automatically or manually using the CST Update Manager.
In case you have performed a local installation of CST STUDIO SUITE on each node you can install the service pack on the MPI Frontend Node and then send the update to the MPI Client Nodes using the following procedure. First update your MPI Frontend Node using the automatic update or the CST Update Manager. This updated installation will now act as a reference installation for your MPI Client Nodes. The cluster update uses the Distributed Computing (DC) system. Thus, you need to start the CST DC Main Controller on your MPI Frontend Node. For this purpose start the "Main Controller Administration" found in the Windows Start Menu folder of your CST installation. In the DC Main Controller enter the path to your updated CST STUDIO SUITE installation in the "Reference Installation" field and a temporary folder. Then start the DC Main Controller by clicking on "Start Server". The dialog should look like this:

After you have started the DC Main Controller
open the MPI Cluster (i.e.
Simulation:
Solver![]() Start
Simulation
Start
Simulation![]() Acceleration
Acceleration![]() MPI Properties)
dialog and press the "Set Main Controller" button. Enter the
name of your MPI Frontend Node where you have started the DC Main Controller
before and press OK. Then press the "Update Active Nodes" button
to send the updated executables to the active MPI Client Nodes.
MPI Properties)
dialog and press the "Set Main Controller" button. Enter the
name of your MPI Frontend Node where you have started the DC Main Controller
before and press OK. Then press the "Update Active Nodes" button
to send the updated executables to the active MPI Client Nodes.
Note: If you access the executables from a network share you need to perform the update only locally on the MPI Frontend Node.
Please note that the update of your Linux installation can only be performed either by the user who installed it or by the "Main User" (This is the user account you specified during the installation process). The update of your Linux installation can be performed using a script called "update_with_supfile" which can be found in your CST installation folder. Download the service pack from the CST fileserver and make the file accessible to all your cluster nodes. Make sure to download the Linux version of the service pack, as there is one file for each Windows and Linux . Log in as root or as "Main User" to all the cluster nodes and enter the command
<CST_DIR>/update_with_supfile "<FULL_PATH_TO_SUPFILE>"
Please note that the full path to the file is required and that the quotes are mandatory.
Note: If you use a shared installation you just need to run this command once on the machine where CST STUDIO SUITE was installed.
If you need to install the CST MPI Service using mpi_install.exe on a large number of MPI Client Nodes, you might consider performing an unattended installation of this service. To perform an unattended installation, first create a response file, which stores the installation settings. Then you can start the installer with that response file. It will install the service without any user interaction.
To create the response file, you need to execute the
installer once interactively. Execute it with the -r
option:
mpi_install.exe -r
Perform the installation. During the installation, a file with the name installer.properties will be created in the same folder as the file mpi_install.exe is in. Make sure you have write access to that directory.
To perform an unattended installation, make the installer
mpi_install.exe
and the file installer.properties
accessible to the MPI Client Nodes. Then perform on each node:
mpi_install.exe -i silent -f installer.properties
This will launch the installer in an unattended mode. The installer
will not be visible. After some minutes, the installation will be completed.
Since version 2011, CST STUDIO SUITE is built on top of the MPI library by Intel, which supports various high speed interconnects. The best available interconnect is chosen automatically. The configuration necessary for the interconnects to be used is described in the following section. You can influence the interconnect selection using environment variables. The most important environment variables are given here, for a complete overview please see the Intel MPI reference manual available at
http://software.intel.com/en-us/articles/intel-mpi-library-documentation/.
Under the Windows operating system, InfiniBand interconnects are supported through the DAPL interface. Please make sure your installed driver supports the DAPL interface and test that it is working using the tools provided with your driver. Some drivers provided by Mellanox do not support the DAPL interface. In that case you might consider installing the OpenFabrics drivers from www.openfabrics.org instead. Please note that for proper operation on Windows, installation and correct configuration of IP over Infiniband (IPoIB) is necessary. The IPoIB network adapters need to have IPs assigned and they have to be able to ping each other using these IPs. If you have OpenFabrics drivers installed, you can verify your installation with the tool
dapl2test.exe provided by OpenFabrics, as detailed in the following section. If dapl2test.exe succeeds, also InfiniBand support of CST STUDIO SUITE should work.
The tool dapl2test.exe is bundled with the OpenFabrics drivers. This tool can perform some tests between two computers through the DAPL interface. If you have chosen the default options during the installation of the OpenFabrics drivers, these tools reside in "c:\Program Files\WinOF" or "c:\Program Files\OFED". To perform a test, you start it in server mode on one of the nodes and run it in client mode on another node:
Run the tool in server mode
on one of the nodes. To do this, start it without any options:
dapl2test.exe
Then you can perform the
test from one of the other nodes. Try
dapl2test.exe /?
For a short usage guide.
To perform some basic tests,
execute the two commands
dapl2test.exe -T P -s <servername> RR
dapl2test.exe -T P -s <servername> RW
Replace <servername>
by the hostname or the IP of the computer on which you started dapl2test.exe
in server mode. Note that you need to specify the IP over InfiniBand address or a hostname which resolves to the
IP over InfiniBand address. These commands perform an RDMA Read and an
RDMA Write test.
InfiniBand is supported under Linux through the OFED verbs interface.
Thus, if you have installed the OpenFabrics Enterprise Distribution CST STUDIO SUITE should already be able to access your InfiniBand network.
You can test your InfiniBand installation as described in the following section.
If you have OpenFabrics Enterprise Distribution installed, you have the six tools
ib_read_bw, ib_read_lat,
ib_send_bw, ib_send_lat,
ib_write_bw, ib_write_lat
installed on your machine. With these tools, you can test whether your InfiniBand interconnect is working and you can test its speed. Usage of all of these tools is identical and shown here on the example of ib_read_lat.
Start the executable in server
mode on one of your nodes. This is done by just starting the executable
without any options:
ib_read_lat
To start the test, execute
the same executable on another node and specify the hostname of the first
node, on which the server process is running, on the commandline:
ib_read_lat <servername>
This should measure the latency of read operations over InfiniBand
between these two nodes. If the measurement is successful, your InfiniBand
interconnect works. On some new hardware, it complains about different
CPU speeds. To ignore these warnings, specify -F
on the commandline.
Please contact CST support for more detailed information or consult the Intel MPI reference manual.
In case you do not use a shared home directory on a Linux cluster, you have to copy your ssh public key to all MPI Client Nodes. To do so, please copy the public key ~/.ssh/id_rsa.pub from your MPI Frontend Node to the file ~/.ssh/authorized_keys on each MPI Client Node.
This can be done for example by using the command:
ssh-copy-id -i ~/.ssh/id_rsa.pub <nodename>
As an example:
If you have four MPI Client Nodes named "node1", "node2", "node3" and "node4", you have to perform the four commands
ssh-copy-id -i ~/.ssh/id_rsa.pub node1
ssh-copy-id -i ~/.ssh/id_rsa.pub node2
ssh-copy-id -i ~/.ssh/id_rsa.pub node3
ssh-copy-id -i ~/.ssh/id_rsa.pub node4
If you log into your MPI Client Nodes for the first time, it will complain that the authenticity of the host can't be established and it will ask you if you want to continue. If this is the case, select "yes".
If you have more than one MPI Frontend Node, repeat this procedure on each of the frontend nodes.
If you want to use your Linux Cluster with a Windows Frontend, repeat this procedure on each MPI Client Node.
MPI Simulation Overview, MPI Cluster Dialog, MPI Troubleshooting