
The heart of Distributed Computing is the Main Controller which acts as a broker of information between the front ends and the solvers. The front ends submit jobs to the Main Controller which then distributes those jobs to the Solver Servers available within the network. The system also controls the transmission of status messages as well as the transfer of result data back to the front ends.
The Main Controller may connect to an arbitrary number of front ends on one hand and to an arbitrary number of solvers on the other hand.
Each computer designated to run simulation jobs needs to have a Solver Server installed locally. The purpose of this server is to maintain communication with the Main Controller and to locally run and control the solver’s executables.
The following diagram illustrates the architecture of the Distributed Computing system:

Once a solver has been started remotely, the corresponding Solver Server communicates directly with the respective front end concerning status messages. This strategy helps to reduce network traffic through the Main Controller which otherwise may become a bottleneck for the flow of information.
Communication within the Distributed Computing system is done via TCP/IP using fixed ports. Make sure that the firewalls are properly configured such that communication channels can be established. Sometimes virus scanners and VPN software can also block TCP/IP communication.
The front end stores the actual job data within a subfolder contained in the project’s main folder. This subfolder is named "DC". The data are then sent to the Main Controller and stored locally in the specified working directory. Please specify a working directory on your local disk drive so that no further network load is generated by accessing files on a network drive. However, since this folder may contain large amounts of data, make sure that sufficient disk space is available.
Once the job is assigned to one or more Solver Servers, the job’s data is transferred and stored locally in the Solver Servers specified working directory. When the simulation is finished, the data will automatically be transferred back to the Main Controllers disk and it will be deleted on the Solver Server’s disk. Therefore the Solver Server needs to store data for the currently simulated project only, but the available disk space should still be sufficiently large.
The simulated data will then reside on the Main Controller until the corresponding front end has successfully transferred the data back to the local disk for further post processing operations. Afterwards, the data is deleted from the Main Controllers working directory.
It is possible to disconnect (i.e. close) the CST front end as soon as a simulation job has been submitted to the Distributed Computing system. Once the front end is connected to the system again, it will automatically receive all previously computed simulation results for the currently opened project. Note: The license server must still be accessible from the Main Controller!
So far, we have focused on the basic architecture of the Distributed Computing system. In the next section we will explain the installation and configuration of both the Main Controller and the Solver Server.
The front end does not require any special setup
procedures other than the specification of the Main
Controller’s computer name and TCP/IP port (File ![]() Options
Options
![]() Main Controller...):
Main Controller...):
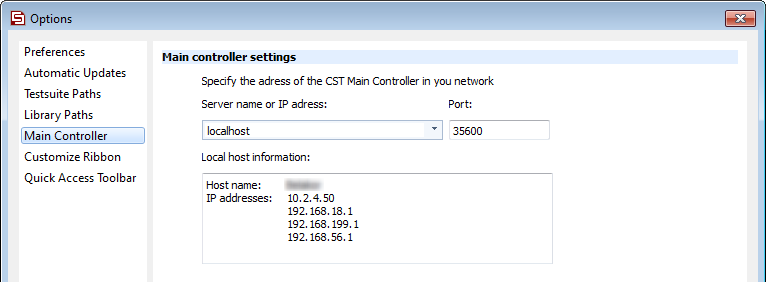
It is also possible to specify a Main Controller for a specific project. The so called local Main Controller Settings dialog box can be accessed via the Acceleration dialog box.
The Main Controller needs to be installed on one computer in the network only. The computer does not necessarily have to have any other components of CST STUDIO SUITE installed.
The installation of the Main Controller is very similar to the installation of the other components. Once you are prompted for the installation type, select Custom to open the following dialog box:

At the bottom of the list of features, find an entry named Distributed Computing System – Main Controller. Clicking on the down arrow next to the corresponding icon will open a context menu. Select ”This feature will be installed on local hard drive” to change the icon from a red cross to a hard drive symbol. In the same way, you may de-select all other components such as the Program Files, Dongle Drivers, License Server and Example Files by selecting ”This feature will not be available” in the corresponding context menus.
The following picture shows the dialog box and how the feature list should look for the installation of the Main Controller only:

Afterwards you can complete the installation of
the component as usual. Once the installation is finished the Main
Controller’s administration panel can be invoked via the start
menu CST STUDIO SUITE ![]() Distributed
Computing System
Distributed
Computing System ![]() Main Controller Administration.
Main Controller Administration.

Here you need to specify a Working directory where all network job data will be stored until the simulation results have successfully been transferred back to the front end. It is highly recommended to use a local hard drive to avoid unnecessary network traffic. The amount of data stored within this folder may become significant, so make sure to have sufficient disk space available.
Furthermore, you need to specify the TCP/IP Server port which will then be used by the Main Controller for communicating with both the front ends and the Solver Servers. Make sure that your firewall is configured such that this port can be accessed properly.
You also need to set a Reference installation directory which is used as a source for the automatic update which allows the automatic distribution and installation of a CST service pack to all Solver Servers.
Furthermore it can be chosen whether a log file should be written. Recover job queue upon restart of DC Main Controller is an option for the unlikely case when the Main Controller is stopped while a calculation is running. After the restart the Main Controller will try to restore the projects based on the remaining files in the working directory.
The Main Controller contains the following security features: Enable password protection of remote changes to the DC Solver Server settings and Specify whitelist of DC Solver Servers. With the first option you can specify a password so that only users who know this password are able to change settings of the Main Controller when connected to it remotely. The second option lets you specify a whitelist of hostnames or IP addresses. The Main Controller will only allow machines on this list to register themselves as Solver Servers. The list of allowed Solver Servers may contain wildcards such as "?" and "*". E.g. blade*.company.net matches blade01.company.net, blade02.company.net, ..., but also bladerunner.company.net. Also for local users of a workstation with DC components installed some security issues are added: Only users which may start/stop the DC service are allowed to make changes to the connected Solver Servers. For users which do not have this right the list of connected Solver Servers is displayed in a different colour.
Show icon in tray will display the following icon in the task tray if enabled.

Enabling this option on Windows operating systems also adds the administration panel to the autostart, so that it will be automatically loaded after every restart. This option is independent of the start of the Main Controller service itself.
Please note that this icon is shown in gray color only, as long as the service is not started. Clicking on the icon will open or hide the Main Controller’s administration panel.
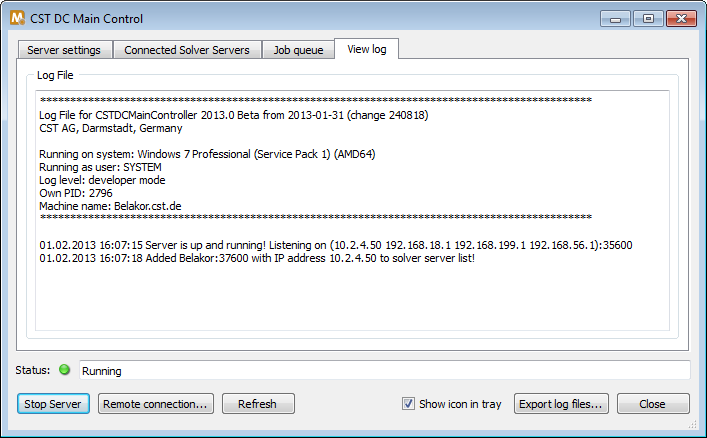
Clicking the Start Server button finally starts the Main Controller’s service.
You can click on the View log tab to see the logging information which provides assistance for troubleshooting:
If the Main Controller in your network is not installed on your local workstation, you can use the Remote connection... to connect to the Main Controller to check its status. You can specify a password to be able to change the settings of the connected Solver Servers remotely if the password protection has been enabled. The Connected clients, Job queue, and View log tab is also available for remotely connected Main Controllers.
The Solver Server needs to be installed on every computer in the network that should be able to remotely run simulations. In contrast to the computer hosting the Main Controller, the dedicated Solver Server computers also need an installation of the Program Files component.
The installation of the Solver Server is done by default with every installation of the CST STUDIO SUITE™. You can access the Solver Server administration panel via the start menu.
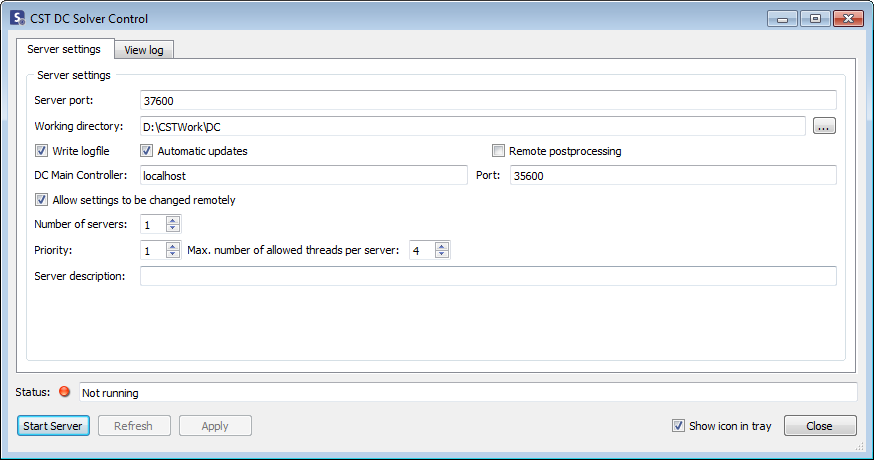
Here you need to specify the Server port number that will be used for communication between the solver modules and the Solver Server. Furthermore, a Working directory has to be specified where the currently simulated job’s data will be stored temporarily. It is highly recommended to use a local hard drive to avoid unnecessary network traffic. Make sure that sufficient disk space is available in order to hold the job’s data.
You also need to specify the name or IP address of the DC Main Controller’s computer together with its TCP/IP Port address. Once started, the Solver Server will automatically connect to the Main Controller.
The Allow settings to be changed remotely check box can be enabled to allow all users to change the settings via Main Controller's Connected Clients tab. If that check box is enabled, the number of Solver Servers, the priority, the number of allowed threads per server, the description and the remote postprocessing flag can be changed remotely. If the check box is not checked, the Solver Servers are displayed with a dark gray background in Main Controller's Connected Clients tab.
You may also specify the Number of servers to run on the local computer. This number specifies the number of simultaneously executed solver runs on the local computer. This setting can also be changed if the solver server is already running. Be aware that it might take some time until the changed settings are visible in the Main Controller.
To limit the used cores for each solver run you can specify the Maximum number of allowed threads per server. The DC systems limits then the number of threads started by the solvers. E.g. if you have a two processor machine with 4 cores on each processor you can start two servers with the number of threads limited to four.
Also a Priority can be set in the dialog box. The smaller number for the Priority setting the higher the priority of a Solver Server. The Priority and the Maximum number of allowed threads per server can be changed even if the Solver Server is running.
If Automatic updates is enabled and the Main Controller was updated to a newer version the Solver Server and the solver executables are also updated automatically.
The postprocessing can be started also on the remote machine if Remote postprocessing is enabled. Keep in mind that this only works if the whole project is calculated on one Solver Server (e.g. TD solver with one port structures or without distributed ports during a distributed parameter sweep or optimization). On Linux this feature is only available if a front end installation is available on the Solver Server.
If you are using the Remote postprocessing feature it is recommended to increase the desktop heap memory.
TIP:
The Windows operation system has a known limitation in the so-called desktop heap memory, which e.g. allows only a certain number of opened windows application.
The Desktop Heap memory is defined and can be increased in the registry editor in the following place:
HKEY_LOCAL_MACHINE\SYSTEM\CurrentControlSet\Control\Session Manager\SubSystems -> Windows
This key "Windows" contains a very long string, which should be similar to the following lines
%SystemRoot%\system32\csrss.exe
ObjectDirectory=\Windows
SharedSection=1024,3072,512
Windows=On
SubSystemType=Windows
ServerDll=basesrv,1
ServerDll=winsrv:UserServerDllInitialization,3
ServerDll=winsrv:ConServerDllInitialization,2
ProfileControl=Off MaxRequestThreads=16
In this long string the Desktop heap memory is defined under: "SharedSection=1024,3072,512" (third value is not always present).
On a 32bit system we recommend to change the SharedSection values into: SharedSection=1024,4096,2048
On a 64bit system we recommend to change the SharedSection values into: SharedSection=2048,20480,2048
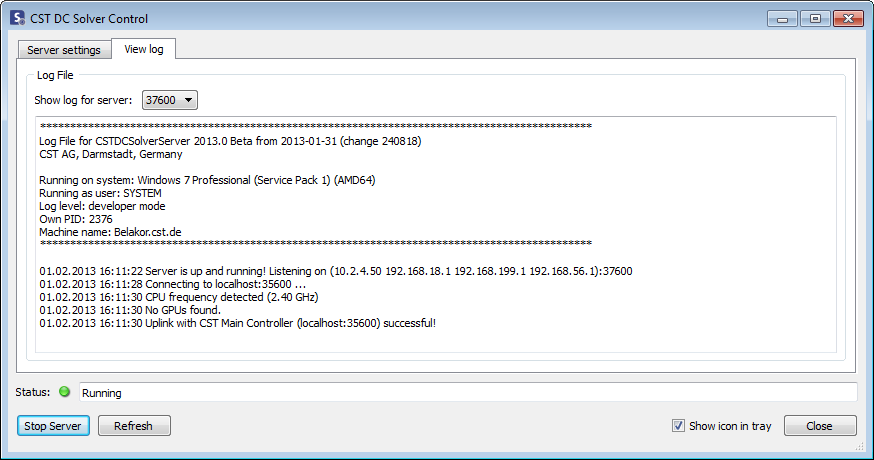
Clicking the Start Server button finally starts the Solver Server service.
If the Show icon in tray option is enabled the following icon will appear in the task tray:

Please note that this icon will be displayed in gray color as long as the corresponding service has not been started. If a calculation is performed the icon changes the color to indicate the calculation process.

You can also use the context menu which is displayed if you right-click on the icon to start/stop the server and show or quit the administration panel. Keep in mind that just closing the administration panel does not stop the DC service.
You can now switch to the View log page in order to get some information that will be valuable for troubleshooting purposes:
Please note that once the Solver Server has started and automatically connected to the Main Controller, it should appear in the Connected clients page in the Main Controller’s control panel:

Here you can find information about the connected solver servers like available memory, installed CPU, available memory, installed GPU and OS information. To enable or disable remote postprocessing on a specific server you can mark the checkbox under PP which stands for Postprocessing. The solver server will then perform the postprocessing remotely if possible (see section about remote postprocessing above). Do not forget to apply your changes.
You can also enable or disable a specific Solver Server. Just click the Use check box to do so. It is also possible to enable or disable all Solver Servers at once by clicking the check box in the header. Disabled Solver Servers are marked with a grey dot in front of the name. If you enable or disable Solver Servers the Apply button will be enabled. Push the button to apply the changes.
When running a remote calculation you can switch to the Job queue tab where an overview of the actual jobs is displayed.

Here you can find the status of the currently running jobs. By right-clicking on the entry a context menu will appear where you can abort a complete job. If the project is still running it will be aborted immediately and all results will be lost. This feature is only available to users which are allowed to start/stop the DC services or specified the correct password when connected remotely to the Main Controller.
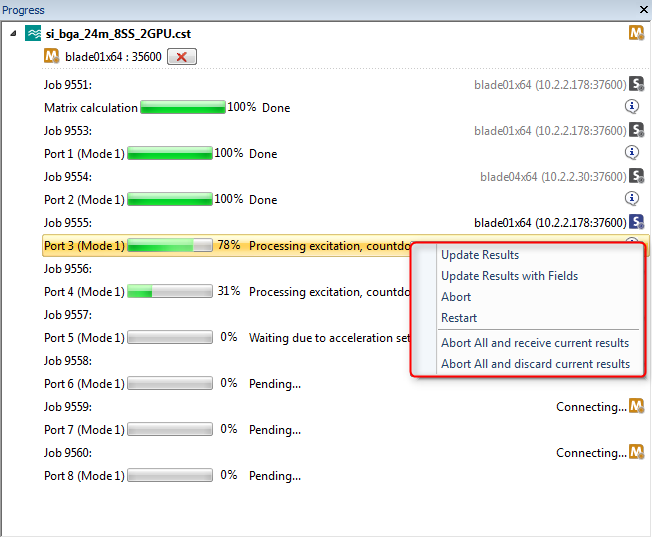
If a distributed job is running the progress can be observed in the Distributed computing status window which is opened automatically.

In the above view every job is listed with additional
information like the Solver Server
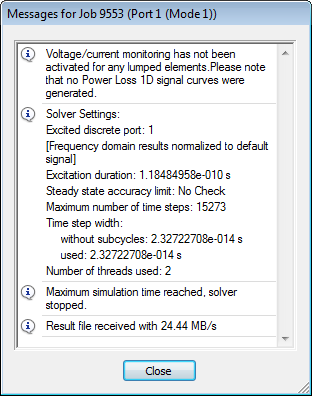
where the job is calculating, the status, etc. By clicking on the info
icon  the
solver output becomes visible and gives further information about the
running calculation (the info icon may also turn into a warning or an
error icon):
the
solver output becomes visible and gives further information about the
running calculation (the info icon may also turn into a warning or an
error icon):
Further interaction is possible by using the context menu of the running jobs. Four options are available: Update Results, Update Results with Fields, Abort and Restart. Update Results will request 1D results from the Solver Server and merge them into the result tree. Update Results with Fields is currently only available for TD solver and will additionally request the intermediate 3D results from the Solver Server. Please keep in mind that requesting the 3D results causes additional network traffic. Abort aborts the selected job and Restart triggers a manual restart for the selected job. The abort button on the bottom of the Distributed computing status window allows the user to abort all jobs at once. The system will ask for a confirmation and allows to keep the intermediate results for the aborted job.
At the end of the distributed simulation the Distributed computing status window closes automatically if no warning or error occurred.
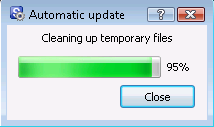
If Automatic update is enabled the Solver Server computer is always synchronized with the version installed on the Main Controller. For Windows systems the Solver Server use the same update mechanism as the front end. It transfers the patch file from the Main Controller and executes automatically the CST Update Manager in the background. If you are logged in you will receive a visual feedback:
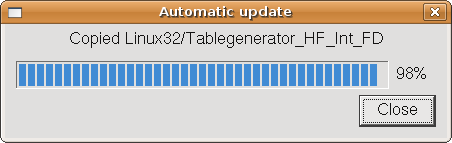
The update mechanism for Linux is a little bit different. If a Linux Solver Server recognizes that it is outdated, it will request a new version from the Main Controller. The Main Controller will pack all files of the Linux directories in the reference installation and send it to the Solver Server where it will be unpacked and copied to the installation directory. A feedback is also provided if a user is logged in.
If your Main Controller is running on a Linux system and your network of Solver Servers has mixed Windows and Linux installations or you want to update the Main Controller automatically, you have to specify a reference installation which points to a complete installation of CST STUDIO SUITE™. The most common way to do that is to mount a Windows share via Samba to the Linux file system. Also a Solver Server installed together with the Linux frontend can not be updated via the automatic update option. Please use the "update_with_supfile" in these cases. Contact CST support if you need help in updating a Linux Main Controller.
Since TCP communication is involved the DC system rely on a stable TCP network. Both DC components are acting as servers and need a proper firewall setup on all DC servers. If you are using Microsoft Windows with the Windows firewall enabled the installer will automatically add an exception to your firewall for the DC components. On other systems or with a firewall from a different vendor you need to make sure that the following TCP ports are accessible for your frontend:
Port: |
Description: |
|---|---|
|
|
|
|
35600 |
Default port of CST DC Main Controller |
|
37600 |
Default port of CST DC Solver Server |
|
3760x |
x depending of how many CST DC Solver Servers are started on the machine |
The frontend machine first connects to the Main Controller and send the submitted jobs. The Main Controller then connects to the conected Solver Servers to start the calculation. If a calculation is running the frontend wants to connect to the Solver Server to receive status and progress messages. If the latter is not possible the calculation will continue, but no progress information is shown nor any intermediate results can be received.
On a Linux system the Distributed Computing system can be run in userspace. In that mode the executables are not running as daemons, but as standalone executables. This means that the DC system is not started automatically on system reboot, but has to be started manually.
To use the non-root DC mode you need an installation of CST STUDIO SUITE™ either installed by the superuser (root) or any other user account using the non-root install mode.
To run the non-root DC executables $INSTALLPATH/Linux32/CSTDCMainController and $INSTALLPATH/Linux32/CSTDCSolverServer need to be started with -e. (e.g. CSTDCSolverServer -e)
When starting the executables in non-root mode, default settings for the TCP ports, working directory (/tmp/CSTMainControllerWork20xx or /tmp/CSTSolverServerWork20xx, respectively), and Main Controller (localhost) are used.
The graphical user interface cannot be used to configure a DC system running in non-root mode. Instead the settings need to be added/changed manually in "$HOME/.cst20xx/CST AG/CST DC Main Control 20xx.ini" or "$HOME/.cst20xx/CST AG/CST DC Solver Control 20xx.ini", respectively.
The ini files start with a section called [Usersettings] followed by a name=value pair of settings. E.g.:
[Usersettings]
ServerPort=37600
WorkingDir=/tmp/CSTSolverServer
In the following table you will find an overview of DC server settings:
|
Common settings: |
Key |
Description |
Valid values |
Default |
|---|---|---|---|
|
ServerPort |
TCP port on which the Main Controller/Solver Server listens |
1024-65535 |
MC: 35x00, SS: 37x00 |
|
WriteLog |
Enables writing of log files |
true/false |
true |
|
LogDebug |
Enables more detailed output in the log file |
1-3 |
1 |
|
WorkingDir |
Working directory where the temporary files should be stored |
Any writable directory |
/tmp/CSTMCUser20xx |
DC Main Controller settings: |
Key |
Description |
Valid values |
Default |
|
AllowedSolverServer |
Only DC Solver Servers specified in this list are allowed to connect to this Main Controller |
Comma separated list of machine names or IP addresses (e.g. blade01, blade02, blade03) |
|
|
UseAllowedSolverServer |
Use the AllowedSolverServer list if enabled |
true/false |
false |
|
DisabledServers |
Specify DC Solver Servers which should not be used to execute a job |
Comma separated list of machine names or IP addresses with port ( blade01:35500, blade01:35501) |
|
|
ReferenceDir |
Directory from which the files used for automatic updates are taken |
Any readable directory |
Installation directory |
|
RemotePassword |
Protect the remote changes to the DC Solver Server settings with a password |
MD5 encoded string |
|
|
UseRemotePassword |
Use the remote password setting |
true/false |
false |
|
Restart |
Attempt to recover the status of the job queue as it was when the DC Main Controller was stopped |
true/false |
false |
DC Solver Server settings: |
Key |
Description |
Valid values |
Default |
|
AllowedSubnets |
Only connect to MC in the specified subnets |
IP address with wildcards (e.g. 255.255.*) |
|
|
AllowRemoteSettingChange |
Allow Solver Server settings to be changed remotely |
true/false |
true |
|
AutomaticUpdates |
Enable automatic updates if the Main Controller version differs |
true/false |
true |
|
Description |
Description of the Solver Server |
Any text |
|
|
InstallPath |
Installation directory where the solvers are started from |
Readable directory |
installation directory |
|
MainController |
Hostname of the Main Controller |
hostname:port |
|
|
MaxCores |
Maximum number of threads a solver is allowed to use |
Any number up to maximum cores on the system |
maximum number |
|
RemotePostprocessing |
Allow remote postprocessing on this server |
true/false |
false |
|
ServerCount |
Number of started solver servers on the system |
Any number |
1 |
|
ServerPriority |
Priority of the solver server in the MC queue |
Any number |
1 |
The Distributed Computing services can also be maintained on a Linux system without an X-server installed. To start/stop the services please use the provided scripts:
/etc/init.d/lsb-cst-maincontroller2013 start
/etc/init.d/lsb-cst-maincontroller2013 stop
The configuration files of the services can be found in
/etc/xdg/CST AG/CST DC Main Control 2013.conf
/etc/xdg/CST AG/CST DC Solver Control 2013.conf
The settings in these files can be specified in name=value pairs. Please backup the original files before manually changing the settings. The install user specified during installation and root has permission to change these files.