|
微波射频仿真设计 |
|
|
微波射频仿真设计 |
|
| 首页 >> Ansoft Designer >> Ansoft Designer在线帮助文档 |
|
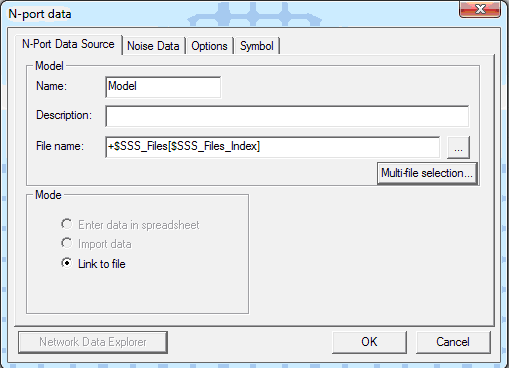
Schematic Editor > N-Port Data Source TabThe N-Port Data Source tab is used to name the N-port device and to specify the source for the data, typically an external file.
• Name — Used to set or change the name of the imported solution as it will appear in the project tree. To change the name, click in the box and then type the name you want. • Description — Used to set or change the description of the imported solution. To change the description, click in the box and then type the description you want. • File Name — Used to set or change the file name of the imported solution. To set the file name, click in the box and then type the file name you want, or browse (...) for a file. • Multi-file selection — Used to create a State-space model. For more information, see Creating a State-Space N-Port Model. • Mode — The network solution data can be entered manually, copied into the project from an external file as Import data, or read from an external Link to file at analysis time. To manually enter solution data, click Enter data in spreadsheet, and enter the network data. • Network Data Explorer allows you to view solution data by opening the Network Data Explorer. When the N-Port Data Source options have been entered, click OK or select another tab.
To copy the N-port data into the project from an external file: 1. Click Import Data in the N-port data dialog shown above. 2. Specify the File name in one of the following ways: • In the filename box, type the file name, including the full pathname, of the file that contains the network parameters you want to use. • Click the browse (...) button to open the Select File dialog box. a. Select the appropriate file type from the Files of type list: b. Use the Look in field to browse to the directory containing the desired file. c. Select the file in one of the following ways: • Click the file’s entry in the list. • Type the file’s name in the File Name box. d. Click Open. Once you have finished, the N-port data is copied into the project from an external file.
To specify an external file from which network parameter data will be read at analysis time: 1. Click Link to file in the N-port data dialog shown above. 2. Specify the File name in one of the following ways: • In the filename box, type the file name, including the full pathname, of the file that contains the network parameters you want to use. • Click the browse (...) button to open the Select File dialog box. a. Select the appropriate file type from the Files of type list: b. Use the Look in field to browse to the directory containing the desired file. c. Select the file in one of the following ways: • Click the file’s entry in the list. • Type the file’s name in the File Name box. d. Click Open. Once you have finished, the network parameter data will be read at analysis time from an external file.
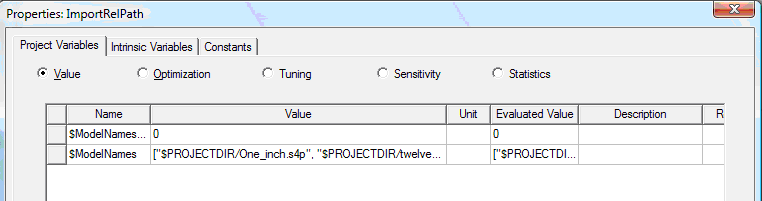
Project Array Variables for File Name N-port models can use project array variables when specifying the file name of the imported solution. For instance, the following can be used to specify the File name: • +$ModelNames[1] • +$ModelNames[$ModelNames_Index] $ModelNames is a project level array variable and $ModelNames_Index is a project level array index variable.
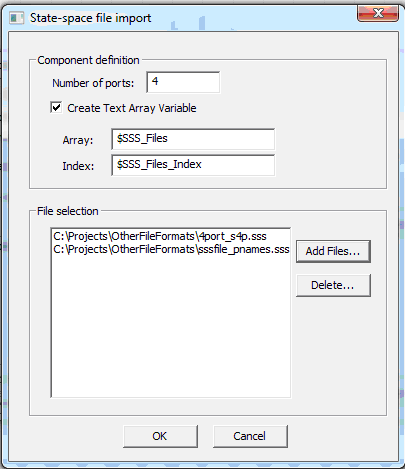
Creating a State-Space N-Port Model To create a State-space model: 1. Click Multi-file selection in the N-Port Data dialog. This opens the State-space file import dialog.
2. You must first enter a number of ports (from 1 to 1000) because that will determine what files you can choose.
3. If you check the Create Text Array Variable checkbox, you must enter names for the Array and Index variables. When you create the model, these variables will be added to the project. 4. By clicking the Add Files… button you can select multiple files which will be shown in the list box. 5. When you click OK, the import dialog is closed and you are returned to the N-port data dialog. If you had unchecked the Create Text Array checkbox, the File name field will have the name of the first file in the list. If the checkbox was checked, the File name field will be populated with the new text array variable expression. 6. Once the model is created, it is ready to be used. You can drag & drop the model onto the schematic and then set up a simulation. The simulation can sweep the entries in the created Text Array Variable — and in this case, $SSS_Files_Index would be the variable to sweep.
HFSS视频教程 ADS视频教程 CST视频教程 Ansoft Designer 中文教程 |
|
Copyright © 2006 - 2013 微波EDA网, All Rights Reserved 业务联系:mweda@163.com |
|