|
微波射频仿真设计 |
|
|
微波射频仿真设计 |
|
| 首页 >> Ansoft Designer >> Ansoft Designer在线帮助文档 |
|
Importing and Exporting Data > Using Excel to Generate an ODB++ Control FileIt is possible to use XML schema functionality in Microsoft Excel to create stackup-layer information that can then be exported to an ODB++ control file. An XML schema is basically a set of rules (constraints) that define the structure and content (elements) of an XML file. Both XML and XML Schema documents (*.xml, *.xsd) are straightforward user-friendly text files, and Microsoft Excel offers an intuitive interface that “maps” elements in an XML schema to data cells in an ordinary worksheet. As such, and because the XML schema is quite simple, it is possible to use a a plain-text XML editor in Microsoft Excel to create stackup-layer controls that are suitable for ANSYS/Ansoft tools. These controls can then be exported to an ODB++ Control File. The schema used in the following example is shipped with Designer v6.0 (or higher) and can be found at <designer_inst_dir>\Stackup.xsd, where <designer_inst_dir> is the Ansoft Designer installation directory. In this example, Microsoft Excel 2007 is used, but Excel 2003 should also be compatible.
1. Access XML Functionality in Excel: To
access the XML import/export functionality in Excel, you must first
activate the Developer Tab. If the Developer Tab is not already visible,
click the Office Button
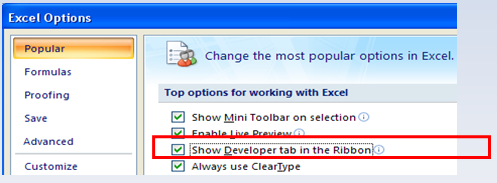 If necessary, select the Popular category, and then click Show Developer tab in the Ribbon. Then, on the Developer tab in the XML group, click Source to display the XML Source task-plane. 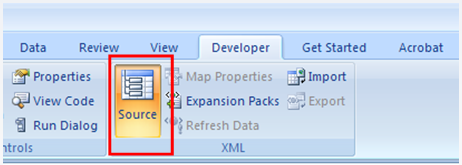
2. Open the Excel Spreadsheet: Open the spread sheet file (*.xls or *.xlsx) that you wish to export to the control file.
In the Excel spread sheet file, make sure there is at least one empty row preceeding the cells you wish to export. If necessary, delete any tags or headers. Click on the following link to open a sample XML stackup file: Sample XML Stackup File.
3. Load the ANSYS XML Schema: In the XML Source task pane, click XML Maps to open the XML Maps dialog box. 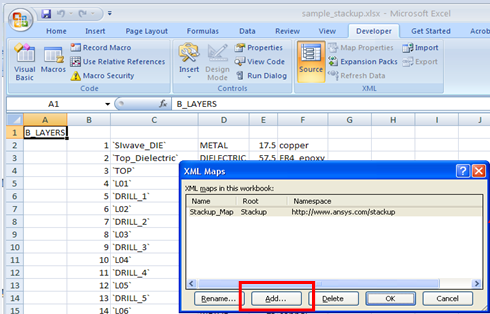
4. Load the ANSYS XML Schema (contd): Click Add to open the Select XML Source dialog box, then browse to the .xsd file in the Designer installation directory and click Open. Next, click OK to close the Source dialog. The XML schema will be loaded into the XML Source Pane. 
5. Prepare the Excel Spreadsheet: In the schema element list that appears in the task pane, those elements with a red star are mandatory fields that you must map to cells in the worksheet. But, you do not need to map a starred element if its parent is not also starred. For most Excel files, you will need to add at least one cell in the worksheet that contains the schema version number — which is currently fixed at “1.0” — you can add it anywhere, but it must be formatted as “text”, instead of the default format “number”, so that the literal string will be exported. You may add additional fields to the worksheet, such as a layer-thickness unit, but this is not required. 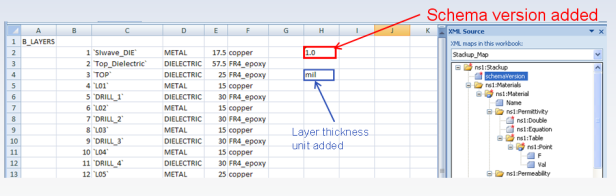
6. Prepare the Excel Spreadsheet (contd): Many pre-existing layer-stackup files may contain names/symbols that are different from those used by the XML Schema. These names will be flagged as errors, even if they represent the same entity. Because of this, these names must be replaced with valid entries before being exported to XML. For example, from the illustration above, “METAL” is not a valid layer type and is replaced with “conductor”, and since XML is case-sensitive, “DIELECTRIC” is replaced with “dielectric”. 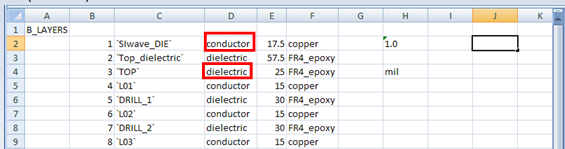
For a complete list of valid entries for each element, open the XML Schema document (*.xsd) in a text editor and search for the element name.
7. Map the XML schema to the workbook: Drag each element from the task pane to the corresponding cell in the workbook. The mapped areas appear in the blue nonprintable borders. Repeat this mapping operation for each element by by draggingit into the workbook. — For columns of data, drop the element on the cell directly above the top row in order to make it the header. — For a single cell, simply drop the element on the cell itself. 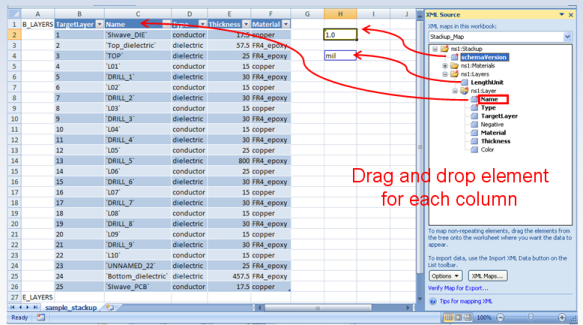
Click on the following link to open a sample mapped XML stackup file: Sample Mapped XML Stackup File.
8. Export to XML File: Select the elements in the task pane that you wish to export. All corresponding mapped cells will be highlighted in the worksheet (Hint: To select all, click on ns1::Stackup). In the Developer tab, click the Export button. In the Export XML dialog that opens, specify a name for the file. Next, click Save and the file is exported to XML. 
9. Review the XML File: You can open the exported XML file in a text editor or Internet Explorer for review. 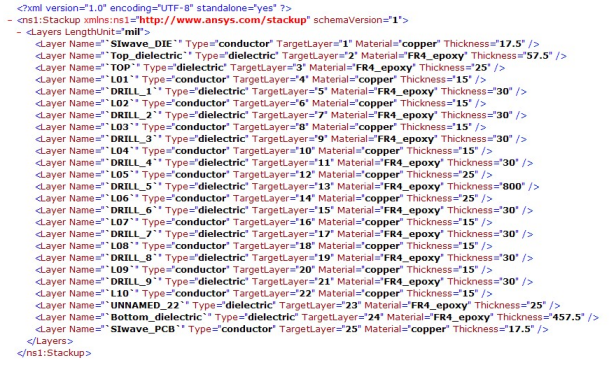
There are also free tools available online to validate an XML file against a given schema, one of these tools is accessible at http://validate.openlaboratory.net/schemaforms/schema1.html.
Additional Resources
XML Tutorial From Microsoft http://office.microsoft.com/training/Training.aspx?AssetID=RC011304651033&CTT=6&Origin=RC011304651033
XML in Excel Tutorial http://office.microsoft.com/training/training.aspx?AssetID=RC011310531033
Free XML Schema validation tool http://validate.openlaboratory.net/schemaforms/schema1.html
HFSS视频教程 ADS视频教程 CST视频教程 Ansoft Designer 中文教程 |
|
Copyright © 2006 - 2013 微波EDA网, All Rights Reserved 业务联系:mweda@163.com |
|
 and then select Excel Options.


